Introduction:
I took a class on this braid from Mistress Thora Sharptooth at Pennsic, with Mistress Disa (Laurel formerly known as Margaret Cameron) as my partner. It is a fascinating braid to make and took less than an hour to produce with the new technique Thora learned from a mother/daughter team overseas. In an effort to share this new technique, I present what I do know here. Please note that there is much more that I do not know that can still be discovered.
History:
Two extant examples of this braid have been discovered, both in the British Isles. The most notable one was as a part of the St. Cuthbert textiles and vestments discovered from 10th c. in Durham, as a silk edging on a tablet woven band. The other was possibly a seam finishing technique on a textile found in Wales, also dated to the 10th c.
Construction:
This braid is composed of five strands, 4 warp and 1 weft. It is commonly called the Guilloche Braid, which is really a generic term for braided structures seen in both textiles and motifs in mosaics. A known way to create this braid was to warp up as with tablet weaving. Two cards would be warped up with just two holes (diagonally set) in opposite threading, one S, one Z. By turning the cards a half turn each time and passing the weft as you would for tubular weaving, you can achieve this braid. Directions for that technique can be found on Mistress Phiala's String Page on Medieval Braids, in the Other Structures section: http://www.stringpage.com/braid/medbraids/medbraids.html
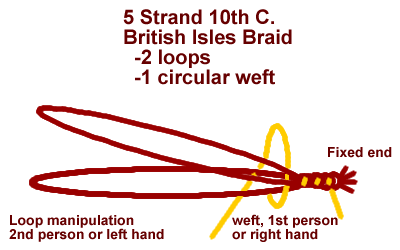
The new technique that Thora learned involves two people, but goes much faster that taking the time to set up a tablet weaving project, even a small one. Hers combines fingerloop braiding techniques with the addition of a weft.
-
Tie off two loops (or bows in fingerloop braiding) to a fixed point. At Pennsic, we used tent poles. At home I used an end table.
-
One person works the weft, while another manipulates the loops.
-
The loops are swapped from one hand to the other by sending one through the other. Which loop goes through which is not important as long as it is consistent for the length of the braid. I had the tendency to pass the left loop through the right loop, no twisting required.
-
After each loop swap, the space between each separate warp loop is the shed. The weft is passed through the two loops, always in the same direction. You can either drop the weft from the top to the bottom of the braid, or pull up from the bottom. I tend to drop through the shed.
-
Continue the practice of exchanging the loops and passing the weft in a circular path until you reach the end of your bows.

I managed to do this technique on my own by using my left hand to perform the loop manipulation, and using my right hand to drop the weft through the shed each time. I was limited by the comfortable span of my arms, but could easily do a yard in an hour.
The Finished Braid:
The completed project will have a tendency to twist on itself like rotini. When carefully stretched out for use as a seam finishing or edge binding, it can be forced to lie flat. The correct side of the braid will show V's of the warp/loop thread, and small triangles of the weft thread. The wrong side will display slashes of the weft thread as is passes across the back of the braid.
Resources:
-Class on the Guilloche Braid taught by Mistress Thora Sharptooth <http://www.cs.vassar.edu/~capriest/thora.html> at Pennsic 34.
The Guilloche Braid
Mistress Thora Sharptooth
Learn to make an unusual early period, northern European woven braid used to cover seams. This is a hands-on class.
Tue 16,10:00 AM, Private Camp
-Mistress Phiala's String Page on Medieval Braids, in the Other Structures section: http://www.stringpage.com/braid/medbraids/medbraids.html